How To Use Figma To Create A Prototype; Step-By-Step Procedure
In today’s competitive world, time is more precious than anything. And when it comes to group collaboration, you can not compromise even a second. To make every second count, Figma is here for designers to improve their products. But how to use Figma to create a prototype? can you make prototyping easier using Figma?
Figma has multiple wonderful features which made it popular within a short time. Prototyping is one of the most fascinating features. It makes the whole prototyping process faster and more concise. Here, I’ve discussed how you can use the prototyping features to make your prototype and create an impact.
How to Use Figma to Create a Prototype?
Creating a prototype using Figma is quite simple and straightforward. But if you are not familiar with the platform and the features, it can confuse you. Here I have explained how you can make your prototype like a Figma prototype tutorial.
Create Account:
Creating an account and logging in is the very first step for doing any project using Figma. Figma is a web-based Design Tool. So, you will not need to install any app or consume extra space to design. You can create an account with a few clicks with the help of your email account and create a new password. You can also create an account using your Google account directly.
Create Layout of The Design:
Before starting the design process, understand what you want and how you want your product to come out. Understand the purpose and what steps you want your users to follow. Make a layout of your design depending on these factors.
Start Designing:
As you already have a plan in hand, now you can start designing. Get to know about the Figma options and use them to make your planned design come true. To make the design responsive and be able to use the prototyping options, you will need to create multiple frames and tasks for users to try on.
Prototyping Options:
Figma has different prototyping options. You can use multiple frames and connect them using the prototyping options. You can start the flow from any point you want and keep going. You can even use multiple flows in one design.
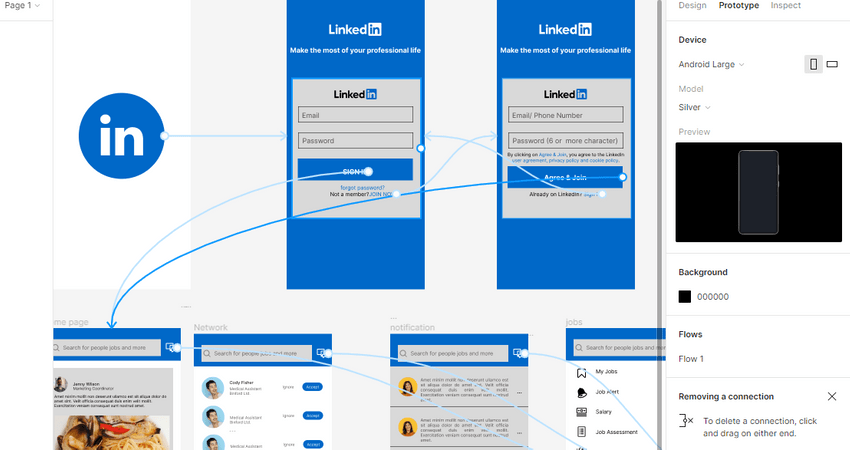
To open the prototype panel and start prototyping, click on the prototype option from the top right panel of your Figma file. To make any changes to your prototype, you need to stay in the prototype panel.
Connect The Frames:
For using the prototyping option, you need to have a frame behind every element. If the element does not belong to any frame, it will not appear in your prototype. Connect the frames using the prototyping option. You can do that simply by clicking on two frames or elements.
Click on the circular sign of the first frame and drag it to the next friend you want to connect with. You can also choose frames by clicking on them, and they will automatically be connected.
Customize Your Prototype:
There are not only some built-in prototyping options in Figma. You can change how you connect frames and how they will act. You can customize your prototype based on your requirement, how the friends will appear and leave the screen and how each task will work.
Click on the connection that you want to edit, then change properties from the ‘interaction details’ window.
Add Animation:
Animation actions have become easier and available in Figma prototyping. You can use different Figma prototype animations. You can change them as you wish to make the prototype more real.
Choose the animation options from the ‘animation’ in the ‘interaction details’. These will control how the second frame of the connection will appear and disappear. You can edit that time of transaction, way, and mode of the animation from here.
Present Your Prototype:
Now, as your prototype is ready, you can present it to other people and show them how you want your product to be. The programmers and developers will understand exactly what they need to do from the prototype. Figma prototyping is very handy and fast for making every click count. While presenting, you can make your Figma prototype fit into the screen or fill the screen. You can also keep the prototype to its actual size.
Click on the play button on the top right corner of your Figma file. It will open your file in a new tab with all the prototyping settings, presenting your design.
Save And Share Your File:
Figma has made sharing your file a lot easier. You can add people in your group and share the file link in Figma directly. You also have the option to save your file on your local device and share it with people outside of your group. You can use either option to save and share files in Figma.
Click on the file, frame, group, or element you want to save. Then go to the bottom right corner of your Figma file. You will find the export option. Set the file form you want to export your design and click on the export button to save the design on your device.
To share your design, click on the share button and add the email address of the person you want to share your design with.
Why is prototyping important?
To create a responsive and effective product, all the members of the design, marketing, and developing team needs to understand what you want from them. And prototyping is the best way to make them understand your workflow and the result you want. By using prototyping, you not only help the designers to understand every tiny detail of your design, but you can also make the work of your developer easier and more effective. Prototyping can give you a faster and more refined result.
It can also improve your communication with your client. Most of the time, clients do not clearly understand the design process. Prototyping helps them understand what will happen and what they want from you. Prototyping is helpful for both parties to make their concept clear and ensure that they are on the same page.
Useful Figma Features For Prototyping
For making a prototype in Figma easier and more effective, Figma has multiple options and features. You can use these options according to your need. Here are some of the key features of Figma prototype options you need to know about.
Starting Point
In the prototype panel, you will find an option named flow starting point. It shows where the flow of your activity starts. It is a blue rectangle with an arrow. You can change the flow name and use this option to navigate your flow.
after selecting the prototype panel, where you click first, your flow will start from that frame. To change your starting point, drag the rectangle that shows the starting of the flow and drop it where you want your design to start from.
Interactions
The interaction panel shows how a layer is connected with another. You can change the interaction mode, the way the layers will appear and disappear and even add animation using this panel.
After creating a connection, click on the arrow and the ‘interaction details’ panel will be opened. You can choose the combination you want from multiple options.
Connections
Connections are mainly arrows that indicate which layer is connected with which one. You can make connections, delete them and change their directions based on your requirements.
Overflow-Scrolling
This feature is useful if any element goes out of the frame or the frame is larger than your presentation screen. You can use the scrolling option to drag the overflowing elements into the frame and show others how they will act.
The overflow-scrolling option only appears when you select a frame where the elements are overflowing from the frame. You can choose how you will be able to scroll from that option.
Background
While you create the prototype, you can also control the background color of your design. It will help you to make your design pop and highlight the features.
Deselect all the layers and elements. Then change the background color from the prototype panel.
Things You Need To Know Before Prototyping Using Figma
If you are new to Figma and have not used the prototype option yet, a few things will help you work better. Here are some Figma prototype tips that you can use to work like a pro.
You Can Change The Starting Point
The starting point determines where the prototype will start working. But if you accidentally start from the wrong point, it can be difficult for others to understand your design. You can change the starting point easily. All you need to do is click on the arrow indicating the starting point and drag it where you want it to be.
You Can Edit Prototype Settings
In the prototype setting option, you can change your device, its direction, and model and see how it will present your design. It can help you make your design easier for others to understand.
Renaming Frames Will Make Your Work Easier
While working with multiple frames, Figma will name them with random numbers. If there are a lot of frames, it will be difficult to keep track of them. You can rename them to identify them whenever you need them and make your work easier.
You Can Use Interaction Details To Make Your Prototype More Interesting
You can use the interactive panel and change the way an element or frame interact with others. It will give you more control over your design and also help you to create complicated designs easily.
Create Overlays Using Your Prototype Design
If you want to make a layer appear on top of another, you can use the overlay options. These will make your animation more lively and give your desired result.
Apart from these, you will find various Figma prototype templates that will help you understand prototyping functions better and give you an upper hand.
Common Mistakes
Not Adding Frame Behind All Elements
It is one of the most common mistakes of beginners. You cannot use any element for prototyping if there is no frame behind it. Every element needs to be in a frame for you to connect them with others. If you do not want your element to be a member of another frame, you can create a frame for that element alone.
Forgetting To Resize And Adjust The Position Of The Next Frame
For synchronizing elements and making a smooth interchange of the frames, resizing and positioning them is crucial. You cannot expect to have a smooth transition without resizing and placing them properly. You can adjust the position of your frame while prototyping.
Forgetting To Rename Your Frames
It is not necessarily a mistake, but forgetting to rename your frames can make your work a lot harder, especially if you work with multiple frames. As the frames are named with numbers by default, renaming them according to your preference can help you identify them faster.
FAQs
Is Prototyping Only Useful For App Design?
No, prototyping is useful for any design. Whether you want to design a website or a mobile app, prototyping will help you understand every command and option your product can have. Every design project needs prototyping for understanding the usefulness and flaws of the design. Prototyping also helps to clear misunderstandings and communicate effectively among team members and others.
How Can I Install Figma Prototyping Options?
You do not need to install or activate any additional features to use the prototype option. It is a built-in feature of Figma. When you create a new design file, you will see the prototype option in the right wing of your design file. But you can add different plugins to make your prototype easier and more effective.
Do I Need To Add Other Features In My Figma To Make My Prototype Effective?
You do not need extra features to present your prototype or share it with others. But while designing, you can add different plugins to make your work easier and faster. These plugins will help you understand how your work is progressing and sometimes work on your behalf.
Can I Include External Files In My Figma Prototyping?
Yes, you can import external design files, pictures, or animations to make your design more interesting. And if they are into the frame of your design, then they will appear in your prototype as well.
Final Words
This interactive, web-based collaboration tool is perfect for any designer who wants to take their game to another level. Understanding how to use Figma to create a prototype will help you to make your prototyping process easier, and faster and add feedback to your design.
Figma is not only a collaboration tool. It is an all in one website for designers and team members to make their work more effective. I hope you enjoy working with Figma and making prototypes more interactive.

